HERE Isoline Routing on Android
Blog|23 April 2021
Isoline Routing, which allows you to define which area is reachable for you under certain constraints such as time or remaining battery, has long been a favourite in our developer community. We are happy to report that this feature is now also available in our new HERE SDKs for Android, iOS and Flutter. In this blog post, I will walk you through determining a reachable area using Isoline Routing with the HERE SDK for Android (Explore Edition). Let’s get started!
Isoline Routing uses the same RoutingEngine you would use for a standard routing call. However, instead of calling calculateRoute() on an instance of RoutingEngine, we call calculateIsoline() instead. This method takes a GeoCoordinate (the centre of the isoline), an instance of IsolineOptions and a callback function as parameters. Before we set all these up, let’s initialise the RoutingEngine itself.
To determine a reachable area isoline for us, the routing engine needs information on how to calculate this area. First it needs to know the range type. Isoline routing supports three different range types.
- Time (in seconds), i.e., which area can I reach if I drive for a certain amount of time?
- Distance (in metres), i.e., which area can I reach if I drive for a certain distance?
- Battery charge (in Watts), i.e., which area can I reach with my current battery level?
Second, it needs to know a range or ranges. These are the specific range values in time, seconds, or Watts, depending on which mode you have chosen. You can either provide a single value or multiple values. If you choose the latter, the routing engine will return a reachable area for each value provided.
Third, you need to select a calculation mode. Isoline routing is a computationally intensive operation, so depending on your use case, you should choose an appropriate mode. The engine provides a balanced mode, a performance mode, or a quality mode. For example, if your application is for visualisation purposes only, performance mode may be right for you. If you’re not sure, you can choose the balanced mode.
Similarly, the isoline polygons returned by routing engine can potentially contain a large number of individual points. This could lead to a degraded performance during visualisation. To counteract this, you can provide a maximum number of points to be used by the polygons. In most cases the default value is fine but keep this in mind if you are running into performance issues.
All the information above is encapsulated in an IsolineOptions.Calculation object, which we can create as follows. In this example, we are using a time-based range and a balanced calculation mode. Setting maxPoints to null results in a default option for the number of points in the polygon shapes.
Now that we have determined how to calculate the reachable area, we also need to determine which transport mode it should consider. We currently support car, truck, EV car, and EV truck. The Android SDK provides an object to encapsulate options for each of these modes (CarOptions, EVCarOptions, TruckOptions, EVTruckOptions). For our example, we are using a standard car, as the default values for CarOptions work just fine and we don’t need to adjust any additional details (such as a consumption model or battery specifications for electric vehicles).
Finally, we create an IsolineOptions object to wrap all the information we have collected above, and we are ready to start routing!

To do so, we call calculateIsoline() and provide our starting waypoint as a GeoCoordinate, our IsolineOptions object and a callback function.
As a final step we want to handle the response and visualise the resulting isoline on a map. The response consists of a list of Isoline objects, which in turn contain a list of GeoPolygons representing the reachable area. First, we iterate over the list of isolines. Remember, that depending on many ranges you have provided, you will get a corresponding number of isolines.
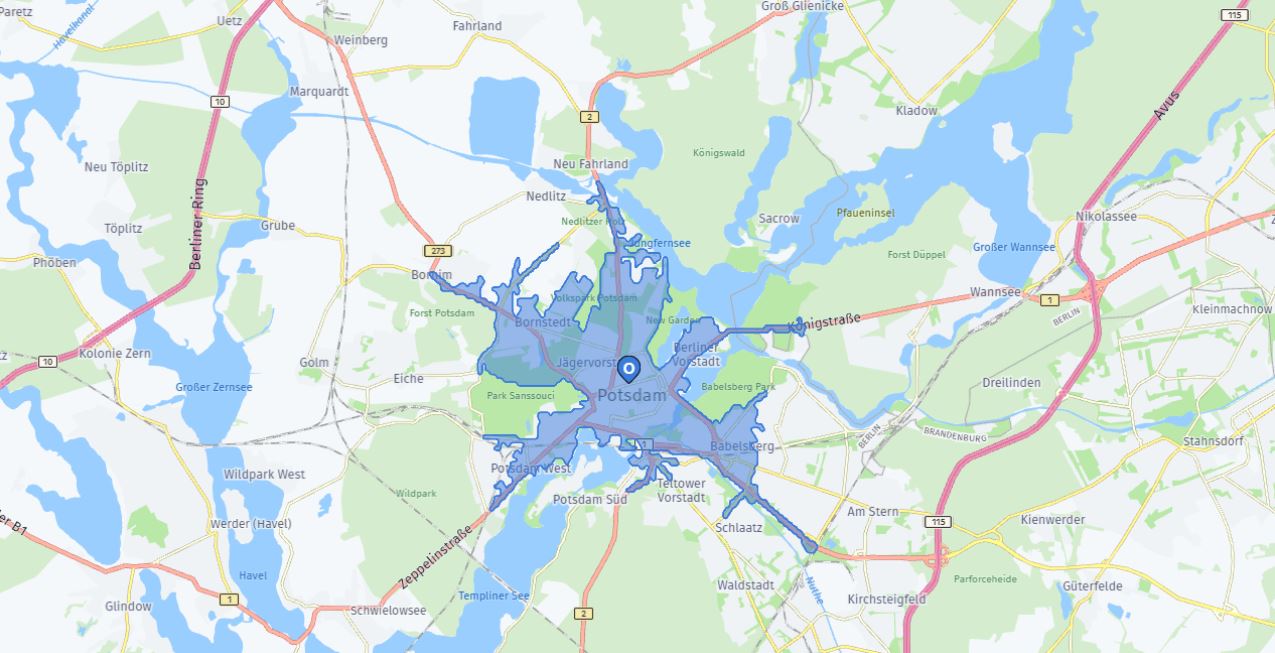
Then we iterate over the list of polygons in each Isoline, create a MapPolygon object for each and add it to the map. Take note that a reachable area may consist of multiple polygons, for example where an island is reachable by ferry. Make sure you display all polygons, not just the first one. The end result should look like this.
Feel free to experiment with multiple ranges, different range types and different transport modes. Check out the full documentation for more details!
Our Grey Matter team of HERE specialists can help you with your use case
to build location-aware apps and services or with API evaluations: +44 (0)1364 655 133 / [email protected]
This post has been re-printed with permission from HERE Technologies.